background

Showing posts with label Recipes. Show all posts

Thursday, June 19, 2014

Herb Drying 101

I'm really into drying and preserving herbs this year. Mostly because buying them in the spice aisle is expensive, and plants are not. Plus, they keep on giving year round here. If you don't live in a warm climate, you can plant your herbs in containers and bring them inside a sunny window during the winter.

Drying your plants is so easy to do! You can always hang dry your cuttings, but I am impatient, so I use a dehydrator. You can get mesh trays to keep the tiny little leaves from falling through the cracks (they'll shrink as they dry).

Just cut your herbs and wash thoroughly. I usually lay mine out to air dry just for about 20 minutes after washing to let excess water drip off.

Thyme, chives, basil, rosemary, and mint. Fresh from the garden.

My dehydrator is an old Nesco. It's a hand-me-down from my mom. The brand is still around, but I think they're a little snazzier now.
 Trim the stems or any unusable parts of your cuttings. Arrange leaves in a single layer on your trays.


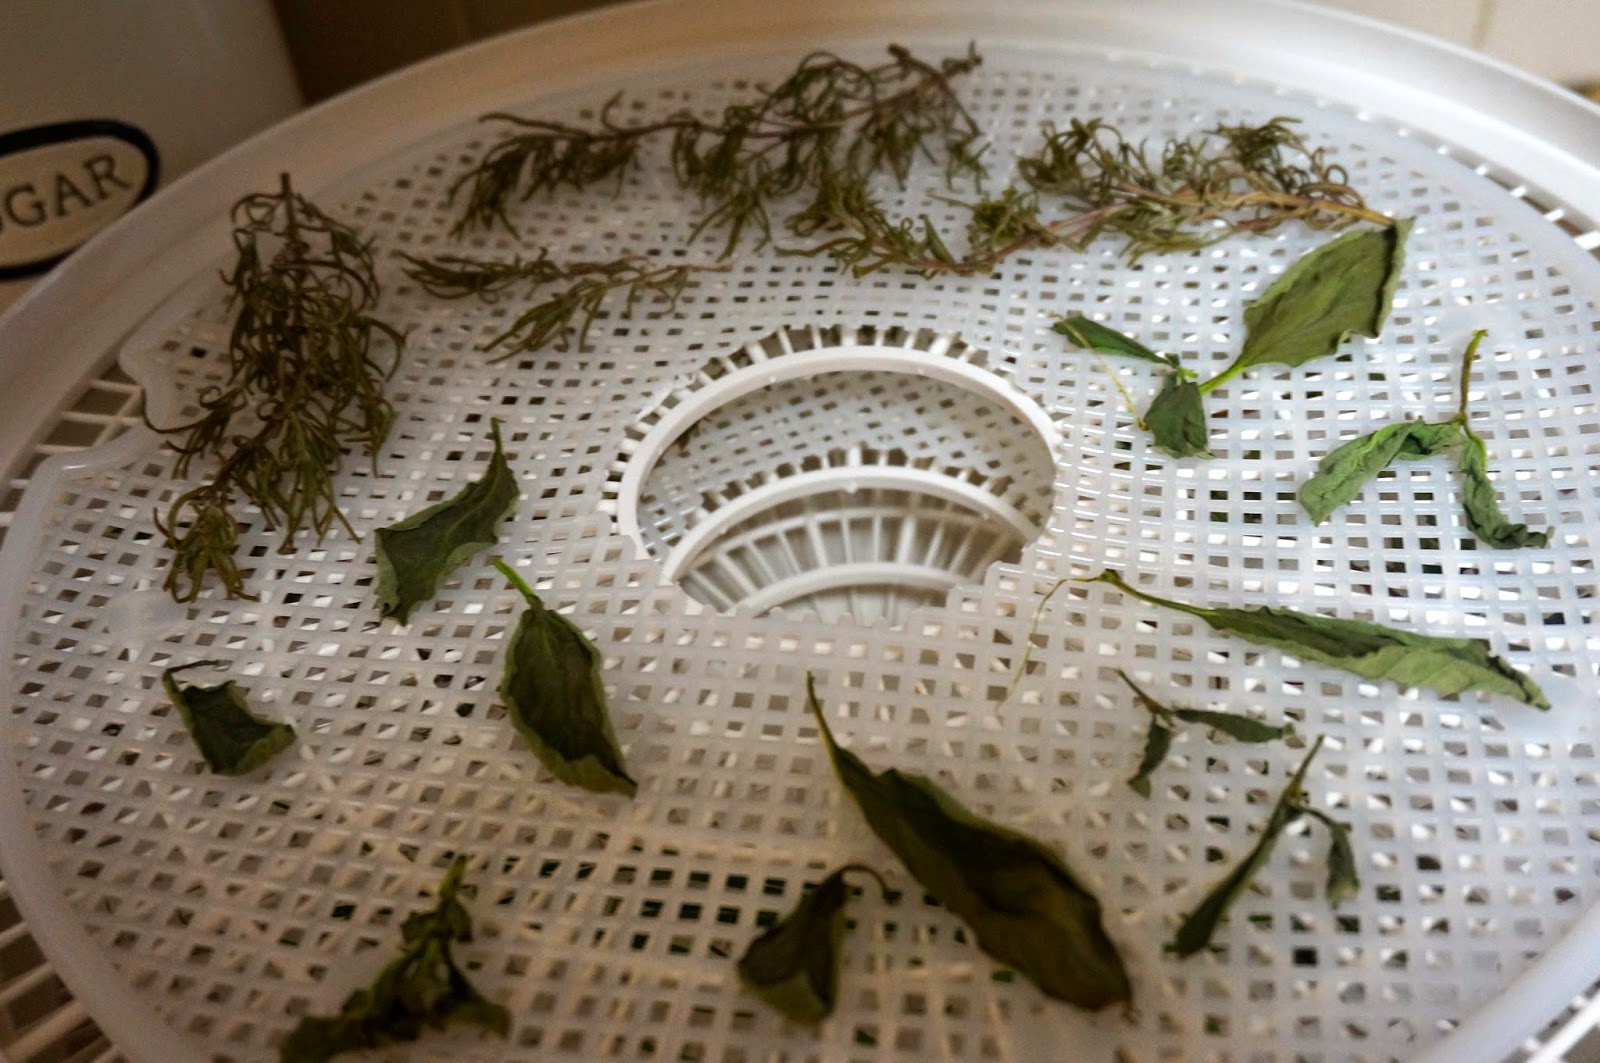
Because my appliance is older, it only has one heat setting. Newer models have varying temperatures available. You may have to play around with your particular settings based on the humidity in your home. It generally takes at least a few hours for everything to dry thoroughly. You want to ensure that everything is dried completely. If moisture is left in the leaves, they could mold after you store them.

This is how they looked after a few hours. Not quite done yet.
I have Tupperware spice containers that worked perfectly for storing my newly dried spices.  I used my label maker so I'd know what was in each container. 


How easy is that? Now you've got spices for a whole lot less, and you can preserve your fresh herbs in case you can't use them all right away!

Note: I've been told that keeping the leaves in their full form until use will guarantee the best flavor. I don't know if this is true or not, but I tend to follow this rule. I just crumble the leaves when I get ready to use them in my cooking.

Monday, February 18, 2013

Valentine's Day Cresents

Hey all!

The hubs and I actually celebrated Valentine's Day by going out for a wonderful lunch on Friday, because an overcrowded restaurant or movie theater is not my idea of a good date. But even though we weren't celebrating, I did attempt some heart-shaped crescent rolls for dinner on V-Day. Unfortunately, they were more heart shaped before they were baked, but it was worth a shot.

I just unrolled the crescent rolls, and sprinkled with a little garlic salt and "pizza" mix shredded cheese, then rolled over the long corners of the triangle to create the heart. I baked according to the package instructions.


Even though these didn't turn out quite how I planned, I totally love experimenting with crescent roll recipes, don't you? In hindsight, I probably should have just used a heart shaped cookie cutter or something. Check out my cute little muffin pan calzones that I posted a while back, or browse Pinterest for infinite ideas! I keep these little bad boys in the fridge at all times.

Thursday, April 19, 2012

Perfect Pot Roast


I created this recipe several years ago mostly by trial and error, just adding things as I went.  It is so easy - lots of ingredients, but you basically just throw everything in a dish, bake and serve.  

Here is what you will need:
1 beef chuck roast (at least 2 lbs.)
1 package of baby carrots (16 oz.)
1/3 cup chopped white onion
1 bag small red potatoes (size C works well - 2 lb. bag)
3 cloves garlic, chopped
1/2 t rosemary
1/2 t oregano
1/2 t Italian seasoning
1/2 t onion powder
1/2 t garlic salt
2 dashes Tony Chachere's seasoning
1 t freshly ground pepper
1/2 t - 1 t freshly ground sea salt
1 T extra virgin olive oil
1 cup water
1 cup red wine (any variety, except dessert wine)

Preheat oven to 350.  Place thawed roast in the center of a 13x5 glass baking dish.  Surround with carrots, potatoes, and onion.  Rub one clove of chopped garlic on roast, and mix the rest of the garlic in with carrots and potatoes.  Drizzle olive oil on carrots and potatoes.  Sprinkle dry ingredients over beef, carrots and potatoes.  Pour water in at the corners (about 1/4 cup water in each corner).  Drizzle about 2/3 cup of red wine over the roast, and the rest over the carrots and potatoes.  It should look something like this:


Cover with foil.  Bake approximately 2 hours or until roast is cooked throughout.  At least once during baking, take out of oven, remove foil, and spoon juices over entire dish to keep moist.

I served with freshly made rosemary batter bread (a recipe I have altered from a Betty Crocker one).  I will post the recipe for the bread later.

Grown-up Grilled Cheese


I posted this recipe on my other blog a while back, but it went so well with my fried broccoli that I had to share:

I had this grilled cheese through hotel room service at a Hilton a few years back and made up my own recipe for it.  Though it's not as quick as slapping a slice of American cheese between two pieces of Wonder bread, it's really easy and sooooo delicious!

All ingredients should be fresh for best taste.  If you live in Texas, you can get all of it fresh at H.E.B.

* Mozzarella cheese (sliced or sliceable - it comes in little balls sometimes, or shredded - don't get either of those)
* Provolone cheese
* Asiago cheese, shredded
* Romano cheese, shredded
* Butter or margarine
* Sourdough bread, sliced for sandwiches

Heat skillet or griddle on medium-medium high heat.  Pair two slices of bread for each sandwich.  Butter the outsides of the bread and then sprinkle lightly with Asiago cheese.  Asiago has a very strong taste, so don't go too heavy with it.  Using the back side of a fork, lightly press the Asiago into the buttered bread to keep it from falling off.  Open your sandwiches, with the buttered sides down.  Cover one piece of bread with slices of mozzarella.  Layer it on thickly - if slicing it yourself, use about 1/4 inch slices; if you are using pre-sliced cheese, you may need a few layers.  Add a few thin slices of provolone on top of the mozzarella.  Sprinkle Romano on top - again this cheese has a strong flavor, so make sure to use a thin layer.  Finish your sandwich with your naked piece of bread, making sure to keep the buttered side out.  Place your sandwich in your skillet or on your griddle and press firmly (but don't smash it!) with the back side of a spatula.  Cook a few minutes, or until the cheese in the middle starts to melt and the outside turns golden brown.  Flip and repeat on other side of sandwich.  Remove from heat source, and cut in half.  Serve immediately.  Goes great with tomato soup, french fries, chips, or fresh veggies.

Pan-fried Parmesan Broccoli

I had some leftover fresh broccoli from the farmer's market that was borderline going bad, so I had to come up with a quick, delish recipe to use it up. This is so fast, easy, and a great way to get everyone to eat their veggies!

2 cups raw, thinly chopped broccoli
2 or 3 T olive oil
1/2 cup grated Parmesan cheese
1 1/2 T shredded Romano cheese
salt and pepper to taste


Heat olive oil in a skillet over medium-high heat for about a minute. Mix cheeses and salt and pepper together in a small bowl. Add broccoli to the skillet and sauté on all sides for a few minutes. Sprinkle half of the cheese mixture on top of the broccoli and cook for a few minutes. Flip broccoli and sprinkle the rest of the cheese on the other side, cook as is for a minute or two. Continue cooking and stirring broccoli every couple of minutes until cheese becomes crispy. Add more olive oil, if necessary, if broccoli becomes dry during cooking.


In my opinion, the crispier this stuff is, the better, just be careful not to burn it. You may need to turn the heat down to medium to avoid burning. Once your broccoli has the desired amount of crisp, remove from heat and serve immediately. It pairs well with my grown up grilled cheese recipe, too. Enjoy!


Sunday, March 11, 2012

Matzo Ball Soup

Since our NYC trip (and the subsequent deli meals) last fall, I have been craving Matzo Ball Soup. Unfortunately, my favorite grocery store does not have a Kosher section, so I couldn't get any matzo meal. There are areas of town with Kosher markets, but I try to avoid traffic if at all possible, so I just had to fantasize about some soup.

Until Friday, that is. While grocery shopping, I noticed an end cap full of Kosher products for Passover. Naturally, there was my matzo meal I'd been dreaming about.


I used the Betty Crocker app on my phone (a lifesaver sometimes, if you haven't seen it before!) to find a base recipe. I say "base recipe" because I made a few changes to it - like I always do. I followed the instructions, but changed up some ingredients here and there.

I didn't have any parsley, so I interchanged with 2 teaspoons of McCormick Italian seasoning (marjoram, thyme, rosemary, savory, sage, oregano, and basil). I used baby carrots, that I sliced up julienne.


For the 1" matzo balls, I just scooped up the mixture with a small spoon, and rolled them into balls between my palms. Some of mine were slightly smaller than 1" so I ended up with more than 15 matzo balls the recipe indicates. That's okay, because they will expand once cooked anyway.


For the broth, I didn't use onions (the hubs hates onions, and I don't care for them in soup, but I like the flavor), I used about 2 teaspoons of onion powder. I also added a few ingredients to liven up the taste of the broth. Add several dashes of fresh ground pepper and salt to taste. About a teaspoon of garlic powder or garlic salt adds some zest. After you add these seasonings, stir well, and then taste to make sure it's up to snuff.

Also, as a tip, scoop the matzo balls up with a ladle or pasta spoon and lower them into the broth slowly to prevent splashing.

It was so, so, so yummy! Great for a rainy, stormy weekend. It will also reheat well for leftovers later in the week.


By the way, I have no idea if the changes I made keep this recipe Kosher, so if that's of concern, you may need to make your own alterations.

Here is the original recipe and ingredients, and you can find the full recipe on the Betty Crocker site by clicking here.


Matzo Balls
2
eggs, beaten
2
tablespoons vegetable oil
2
teaspoons finely chopped fresh parsley
1/4
teaspoon salt
Dash ginger
1/2
cup matzo meal
2
tablespoons water
Soup
6
cups Progresso® reduced-sodium chicken broth (from two 32-oz cartons)
1/2
cup thinly sliced carrots
1/4
cup thinly sliced celery
2
green onions, sliced
12

  • In small bowl, stir eggs, oil, parsley, salt and ginger until blended. With hand mixer, beat until mixture is light and fluffy. Add matzo meal and water; stir until smooth. Cover; refrigerate 1 hour.
  • Meanwhile, in 4-quart saucepan or Dutch oven, heat all soup ingredients to boiling over medium-high heat. Lightly form matzo ball mixture into 15 (1-inch) balls. Drop matzo balls into boiling soup. Reduce heat to medium low; cover and simmer 25 to 30 minutes or matzo balls are thoroughly cooked.


  • Friday, February 17, 2012

    Tea Berry Smoothie

    I saw a great idea on Pinterest (linked from the Glamour site) for strawberries dipped in yogurt and then frozen for a quick treat. You can see the idea here. They were good, but the coldness and the tartness of the berries shocked my mouth a little, so I had the idea to make a smoothie out of them. They easily provide fruit and yogurt to your smoothie and because they are frozen, you don't need to add ice. Plus, 8 oz. (1 cup) of this V8 juice has 1 serving of fruit and veggies! AND -- the local honey helps fight allergies! This smoothie is a winner, for sure!

    I made this yum-tastic smoothie yesterday for breakfast and I have to say, it was deeee-lightful.

    You will need:
    6-8 frozen yogurt strawberries
    1 cup Gloria Jean's Pomegranate Berry Fusion tea
    1 teaspoon local honey, dissolved in hot tea
    1 cup Strawberry Banana V8 Fusion
    Blender

    You will do:
    Brew tea, allow to cool. Add all ingredients to blender. Blend well. Add more berries for a thicker consistency.

    You can substitute:
    Without tea, add an extra cup of juice.
    Any other berry flavored tea.
    You could also yogurt dip and freeze other berries and use those instead.
    Add more or less honey to taste. Get your tea up to your taste preference and then add to blender.

    Tuesday, February 7, 2012

    Muffin Pan Calzones

    I'm still pondering the best way to makeover my lamp (I've run into a few snafus), so in the meantime, here's a tasty - read, easy! - little snack to keep things moving.

    This is one of those I-made-it-up-based-on-what-I-found-in-the-fridge recipes, so you can easily add in other ingredients to suit your own tastes, i.e. veggies, different meats, etc.

    What you will need:
    1 can of refrigerated crescent rolls
    8 cubes of mozzarella cheese
    16 pepperoni slices
    about 1/2 cup of Italian blend shredded cheese
    1 T garlic salt or garlic powder, more or less to taste
    pizza or marinara sauce

    Preheat your oven to the temperature specified on the crescent rolls. Lightly coat a muffin pan with cooking spray. Line the muffin cups with unrolled crescents, forming to the shape of the cups, like this:


    Fill each crescent roll with 1 cube of cheese, 2 pepperoni slices, and shredded cheese. Sprinkle garlic evenly over all cups. Wrap the ends of the crescents over the toppings like this:


    Add a dash of garlic on top, and sprinkle with few pieces of shredded cheese. Bake 5-10 minutes until the crescent rolls turn golden brown and cheese is melted. While baking, heat pizza sauce in the microwave in a microwavable dish for about 30 seconds. Make sure to cover it with a paper towel or a microwave safe top. Remove calzones from oven and serve with warm pizza dipping sauce. Enjoy!


    Monday, January 30, 2012

    Margherita Flatbread Pizza

    The recipes I make usually fall into one of the following categories: something I made up based on what I have found in the pantry, something I ate at a restaurant and am now trying to duplicate, or a recipe I got from a friend, website or cookbook that I have made changes to so it suits my tastes.  This one falls into category two.

    When we were in New York City last year, we ate dinner at a great little Italian restaurant with some friends.  We had Margherita flat bread pizza as an appetizer and it was SO good I had to try to recreate it, so here's my take on it.  Like most things I cook, it is easy, quick and has minimal ingredients.

    2-3 smallish tomatoes (I used Campari)
    2 large fresh basil leaves
    1 piece of garlic flat bread
    fresh mozzarella cheese (the kind that's sliceable - you'll need about half the log)
    1/2 T Kraft Tuscan House Italian dressing
    Cooking spray


    Preheat oven to 375 degrees.  Spray a pizza pan with cooking spray.  Bake flatbread on pizza tray approximately 7 minutes, or until it has crisped on the top and bottom.  Be careful not to let it get overdone, since you'll still have to cook it with the toppings on it.  While bread is baking, chop basil into thin strips.  I get the best results by rolling the leaves and then cutting them with my kitchen shears (my most favorite of all kitchen utensils) like this:


    Next slice into quarters and remove the cores and seeds of the tomatoes (I'm sure there is a technical term for this, but I don't know what it is, so just go with it). They should look like this:


    Then go ahead and chop the tomatoes into small pieces. I used my kitchen shears for that, too.


    In a small skillet, heat 1/2 T salad dressing over medium low heat. Add chopped tomatoes in basil. Cook just until the veggies are warmed, stirring frequently. If you overheat this mixture, the tomatoes will start to fall apart and turn into tomato goop (technical term) and the basil will turn dark green. The whole heating process will probably only take about 2 minutes. This gives enough time for the flavors to mix while keeping the bright colors and without things getting gross. It should look something like this:


    Place a strainer in the sink, and dump entire tomato mixture in strainer, letting excess moisture drain off. By this time, your flat bread should be crisp and out of the oven. Cover entire flat bread with slices of mozzarella.  The more cheese you like, the thicker your slices should be.  I'd say mine were about 1/8 an inch.  Like so:


    Then drizzle your tomato mixture on top of the cheese. I do this just by spooning it on wherever.  It doesn't need to be neat. Sloppy is pretty. Bake for about 4 minutes, or until your cheese is nice and melted and gooey-looking (another technical term).  Remove from oven, slice, and enjoy!


    Disclaimer: If you've ever seen my recipes before, or will ever see them again, know that I substitute a lot of ingredients. For instance, the restaurant had plum tomatoes listed on the menu, but I couldn't find any. I figured plum tomatoes must equal some sort of small tomato, and the ones are picked were about plum size, and it worked.  Any tomatoes you have on hand, or your favorites will do, I'm sure. Also, another kind of Italian dressing will probably work, or even a vinaigrette would probably do just fine. I would NOT use a zesty Italian, but then again, I don't like zesty Italian anyway. Also, you can use any kind of flat bread you want, but I like the garlic flavor of the one I had because then I didn't have to add garlic.

    The restaurant's flat bread was a little thinner but other than that, this is a pretty close example. Tasty and easy - two of my favorite things!

    Please let me know if you have questions or suggestions.