background

Thursday, April 19, 2012

Perfect Pot Roast


I created this recipe several years ago mostly by trial and error, just adding things as I went.  It is so easy - lots of ingredients, but you basically just throw everything in a dish, bake and serve.  

Here is what you will need:
1 beef chuck roast (at least 2 lbs.)
1 package of baby carrots (16 oz.)
1/3 cup chopped white onion
1 bag small red potatoes (size C works well - 2 lb. bag)
3 cloves garlic, chopped
1/2 t rosemary
1/2 t oregano
1/2 t Italian seasoning
1/2 t onion powder
1/2 t garlic salt
2 dashes Tony Chachere's seasoning
1 t freshly ground pepper
1/2 t - 1 t freshly ground sea salt
1 T extra virgin olive oil
1 cup water
1 cup red wine (any variety, except dessert wine)

Preheat oven to 350.  Place thawed roast in the center of a 13x5 glass baking dish.  Surround with carrots, potatoes, and onion.  Rub one clove of chopped garlic on roast, and mix the rest of the garlic in with carrots and potatoes.  Drizzle olive oil on carrots and potatoes.  Sprinkle dry ingredients over beef, carrots and potatoes.  Pour water in at the corners (about 1/4 cup water in each corner).  Drizzle about 2/3 cup of red wine over the roast, and the rest over the carrots and potatoes.  It should look something like this:


Cover with foil.  Bake approximately 2 hours or until roast is cooked throughout.  At least once during baking, take out of oven, remove foil, and spoon juices over entire dish to keep moist.

I served with freshly made rosemary batter bread (a recipe I have altered from a Betty Crocker one).  I will post the recipe for the bread later.

Grown-up Grilled Cheese


I posted this recipe on my other blog a while back, but it went so well with my fried broccoli that I had to share:

I had this grilled cheese through hotel room service at a Hilton a few years back and made up my own recipe for it.  Though it's not as quick as slapping a slice of American cheese between two pieces of Wonder bread, it's really easy and sooooo delicious!

All ingredients should be fresh for best taste.  If you live in Texas, you can get all of it fresh at H.E.B.

* Mozzarella cheese (sliced or sliceable - it comes in little balls sometimes, or shredded - don't get either of those)
* Provolone cheese
* Asiago cheese, shredded
* Romano cheese, shredded
* Butter or margarine
* Sourdough bread, sliced for sandwiches

Heat skillet or griddle on medium-medium high heat.  Pair two slices of bread for each sandwich.  Butter the outsides of the bread and then sprinkle lightly with Asiago cheese.  Asiago has a very strong taste, so don't go too heavy with it.  Using the back side of a fork, lightly press the Asiago into the buttered bread to keep it from falling off.  Open your sandwiches, with the buttered sides down.  Cover one piece of bread with slices of mozzarella.  Layer it on thickly - if slicing it yourself, use about 1/4 inch slices; if you are using pre-sliced cheese, you may need a few layers.  Add a few thin slices of provolone on top of the mozzarella.  Sprinkle Romano on top - again this cheese has a strong flavor, so make sure to use a thin layer.  Finish your sandwich with your naked piece of bread, making sure to keep the buttered side out.  Place your sandwich in your skillet or on your griddle and press firmly (but don't smash it!) with the back side of a spatula.  Cook a few minutes, or until the cheese in the middle starts to melt and the outside turns golden brown.  Flip and repeat on other side of sandwich.  Remove from heat source, and cut in half.  Serve immediately.  Goes great with tomato soup, french fries, chips, or fresh veggies.

Pan-fried Parmesan Broccoli

I had some leftover fresh broccoli from the farmer's market that was borderline going bad, so I had to come up with a quick, delish recipe to use it up. This is so fast, easy, and a great way to get everyone to eat their veggies!

2 cups raw, thinly chopped broccoli
2 or 3 T olive oil
1/2 cup grated Parmesan cheese
1 1/2 T shredded Romano cheese
salt and pepper to taste


Heat olive oil in a skillet over medium-high heat for about a minute. Mix cheeses and salt and pepper together in a small bowl. Add broccoli to the skillet and sauté on all sides for a few minutes. Sprinkle half of the cheese mixture on top of the broccoli and cook for a few minutes. Flip broccoli and sprinkle the rest of the cheese on the other side, cook as is for a minute or two. Continue cooking and stirring broccoli every couple of minutes until cheese becomes crispy. Add more olive oil, if necessary, if broccoli becomes dry during cooking.


In my opinion, the crispier this stuff is, the better, just be careful not to burn it. You may need to turn the heat down to medium to avoid burning. Once your broccoli has the desired amount of crisp, remove from heat and serve immediately. It pairs well with my grown up grilled cheese recipe, too. Enjoy!


Tuesday, April 3, 2012

2

Today is mine and my husband's 2nd wedding anniversary, and while I had been making something to commemorate it, I, of course, didn't quite finish it in time.

I'll post a tutorial and photos as soon as it's ready. As a teaser, let's just say, it involves maps, pillows, a wedding dress and my grandmother-in-law's hope chest. Can't wait to share!

Tuesday, March 27, 2012

Painting the Deck

Hey everyone! Sorry I've been MIA for a while. I've been really busy doing not fun projects. And by not fun, I mean repainting our deck in 85 degree weather. It really wasn't fun, and it's probably not that interesting, but just to prove to you that I have, in fact, been busy and not neglecting you, here's some pictures as evidence.

Before: the deck was white. Which sounded like a great idea until you factor in our four dogs and their footprints. Not cool.


Two of my pooches. On the left, Lola the Pomeranian, on the right, Bridgette the lab mix/pound puppy. Lola tries to copy everything Bridgette does.


Midway through painting.


Finished product. I might go back through and paint the cross rails red, too, and touch up the pickets. We'll see how hot it is next week. 


Also, for some reason, the red is scraping off in a few places. Not sure what's up with that. The hubs thinks it may sink in better if we use an oil based paint. I used an acrylic solid stain specifically designed for outside surfaces. I should figure it out and fix it, but it's really hot, I'm a little sunburned and covered in mosquito bites. I would have so been the first one to die in The Hunger Games.

Speaking of T.H.G., who went to see it this weekend? We went to a 3 a.m. showing on Friday morning because all the midnight screenings were sold out. It was totally worth it. I'm a HUGE fan of the books, and enjoyed the movie. Probably would have preferred a few things done differently, but that's just because my imagination is better than any movie!

For now the deck works for me! I think I'll figure out a solution later. Unless any of you have suggestions? In the meantime, I'm ready for summer barbecues and pool parties!

Saturday, March 17, 2012

Repurposing for a Purpose

Today I want to talk about repurposing items. I am not talking about items in your house that you no longer use, that you turn into something else, although I do love that. I'm talking about items that you buy or acquire with the intent of using it for another purpose from the get-go.

I do this a lot around my house. So much, in fact, that I actually had problems figuring out what to take pictures of in my house because I have used these things for unintended purposes so long I forgot that they weren't originally created for the way I'm using them. And then I re-read that last sentence and realized I confused myself. Hopefully you're still with me.

I've got some repurposing ideas that I think are pretty crafty - and useful - to show. Maybe they'll inspire you.

First up, window finials! You know, those cute little curtain rod caps that add flair to window coverings? 

Curtain rods with finials from Pottery Barn
In an effort to change things up (and to avoid excessive holes in our freshly painted walls), we opted out of traditional curtain rods in our formal dining room and my hubby's office. 

Instead, we found some finials on clearance at Lowe's for a couple of bucks each. They already have a screw on the back side, so we just screwed them right into the wall a few inches above the window. 


Note: if you are placing the finials into a stud, you may need to pre-drill before screwing it in. Also, unless you're sure you're hitting studs, you will either need to use sheetrock anchors or use a lightweight curtain, like the sash I used.

And now, moving on to decanters. You often see these things on wedding registries or in nice housewares stores, but honestly, I don't know anyone that uses them. Usually made of crystal or a less expensive look-alike, they are pretty but not super practical. 

Lenox crystal decanter

I found a monogrammed decanter on clearance for $7 at Tuesday Morning. I had been looking for an olive oil bottle, but the decanter is so much more fun! Plus, with the stopper, I don't have to worry about bugs or dirt getting down those oil pour spouts.

If you've got a decanter laying around your house, why not put it to use with olive oil, vinegar, or some other liquid you use with frequently, while displaying it on your counter?


On the other side of my kitchen, I've enlisted the help of Realspace DVD/CD storage bins from Office Depot to hold recipes and coupons. The embossed pattern of the bins matches the damask print of my floor rugs, and the teal and black colors look good with both the rug and the glass bottles I have behind my glass cabinets.


In our master bathroom, I took the idea from the DVD/CD storage bins, and picked up some fabric lined baskets from Target that are also meant to hold DVDs. The hubs and I each have one, and they serve to hold all of our toiletries so they counter stays clean. Whenever we're getting ready, we just grab our basket, and then put it back on the shelf above the tub when we're done. 


All of these items are cute, functional, and being purposely repurposed!

Be inspired! Go forth and repurpose something today!

Sunday, March 11, 2012

Ikea Medicine Cabinet and First Aid Kit

I finally finished my Ikea medicine cabinet/first aid kit. If you remember from my initial post about it, it was a salvage from the "as-is" corner of the store, and therefore it had no internal shelves or shelf pins. Simple enough fix, right? Ha. Not so much.


I figured I'd pop right down to Home Depot and pick up some shelf pins. Well, it turned out the shelf pin holes were a totally non-standard size. Shocking, considering this is a piece of Ikea furnishing, right? They were a way, way small size of 1/8". 

My dad suggested buying a steel or aluminum rod and cutting it, but neither HD or Lowe's carried those small enough. My hubby suggested cutting pieces off of a wire hanger. Too small. Back to the store I went. We finally found some nails with a 1/8" head, and I decided I could make those work. I don't know what kind of nails these are, but they have a little white "top hat" at the head of the nail. It worked out perfectly, because it extended the amount of the nail that was 1/8" so, put in head first, they fit securely in place.


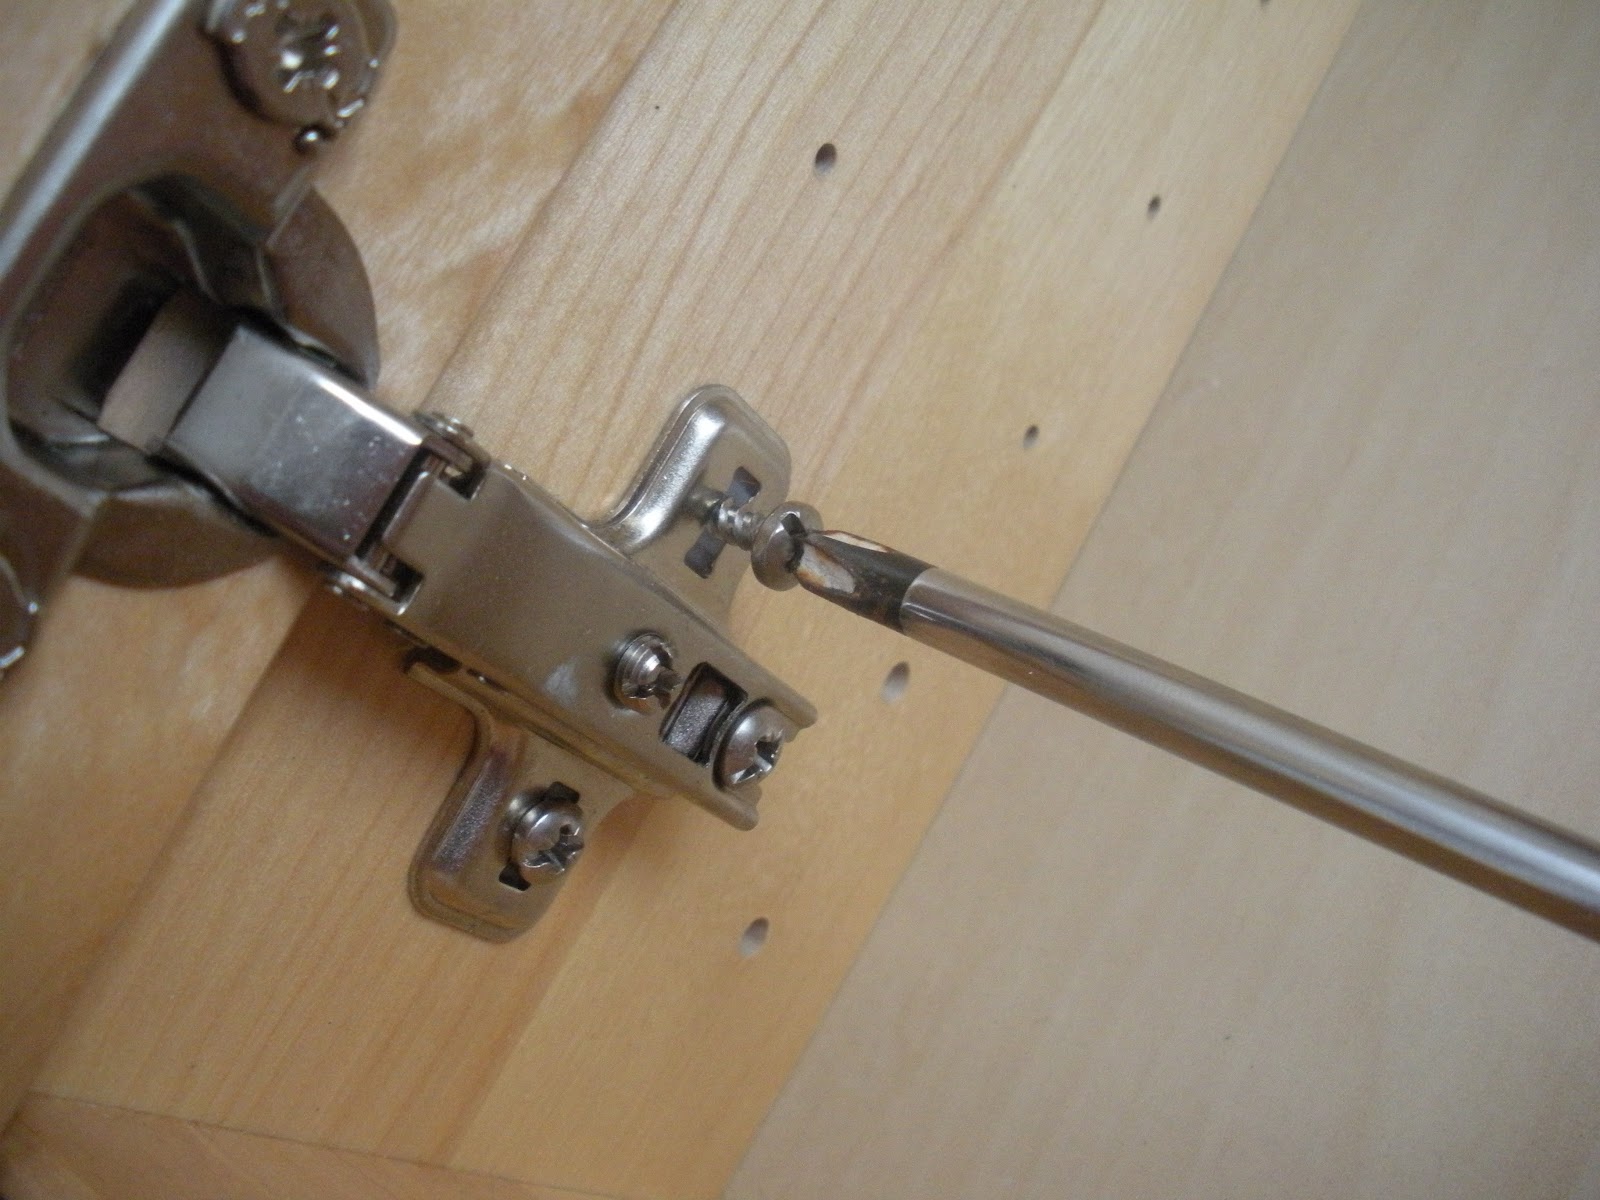
Now that my shelf pin problem was solved, I set out to change the doors. They opened from the right, yet, with the location I was hanging, I needed doors to open on the left. After careful inspection, I noticed that Ikea had cleverly left spaces on both sides of the cabinet, so you could configure the doors however you wanted. I found holes on the exact opposite side of the cabinet from where the hinges were currently mounted. You can see (circled below) that they are bigger than the shelf pins, which is how I knew what they were:


I easily unscrewed the hinges where they were attached to the side of the cabinet, pried out the plastic insert using a flat blade screwdriver, stuck it in the other side, flipped the door, and screwed it back in. I then repeated with the top door. With this one I had to make sure there was a spot for the lock to swing into, and luckily there was, otherwise I would have had to get the hubs to route out a spot.


I then used a very legit measuring device to determine my shelf placement. 


And, using needle nose pliers for leverage and grip, I shimmied the nails into place. It was a pretty tight fit, so I don't think I'll be adjusting the shelves anytime soon. I used 4" wide, thin pieces of aspen (probably about 1/4") to create shelves. 

I found a first aid kit at Sam's Club for under $20, and removed the contents to put into my first aid kit. I put loose items like the individual antiseptic wipes, q-tips, gauze, single packets of things like pain reliever, antibiotic ointment and burn relief cream into Really Useful Boxes that I got at Office Depot. I LOVE Really Useful Boxes because they are cute, durable, and come in lots of sizes and colors. I also picked up some cork tiles for inside the lower cabinet door. The cork board can be used for emergency numbers, or important instructions or contacts for the kids, or a pet or house sitter (or a baby sitter for those of you with little ones). A Command hook holds scissors and tweezers.


Again, since this was an as-is item, it did not have any hanging hardware, but it did have two nickel sized, metal-reinforced holes in the back, through which I guessed it was supposed to hang. I picked up some toggle bolts, and washers (since the holes were WAY bigger than the heads of the bolts), and drilled holes into the sheetrock (after using a stud/electrical finder to determine there was nothing of importance behind where I was hanging). Toggle bolts are good when you can't mount something to studs. Just follow the instructions on the packet or - thread the bolt through the washer, then through the hole inside the cabinet, then screw the toggle on the bolt (behind the cabinet). Squeeze together the toggle, insert into the hole in the drywall all the way, then tighten the bolts.

Since the top locks, it's the perfect place for cold medicine or prescription medications. My cabinet is high enough that any little hands that might be over can't reach it anyway, but just to be safe, it's there if we need it. I positioned the cabinet in the laundry "room" - which is really a closet - since it's centrally located between the garage, kitchen, and backyard/pool - where most boo-boos tend to happen.


Seeing it next to my white laundry cabinets, makes me want to paint it and get matching knobs for all the doors. Hmm...