Happy Leap Day! Do you have any fun projects planned for your extra day? I've got one that I'm working on...hopefully it will be done drying tonight so I can share!
Since Google Friend Connect is about to go away, please follow me via the Linky Follower box to the right to stay updated with my blog!
Thanks for following, and again Happy Leap Day!
Wednesday, February 29, 2012
Sunday, February 26, 2012
Restore
Yesterday morning, I noticed a sign for a new store in a shopping center I was driving by. We are getting a Habitat for Humanity ReStore! I have never been to one, but my dad tells me there are all kinds of deals to be had on building supplies and home goods. From what I understand, it's basically a thrift store/resale shop for the aforementioned type of wares.
I am SO EXCITED. I'll be there on opening day. Not that I particularly need anything, but I'm sure I will find something fabulous! And then I'll share tell you all about it here.
The Habitat store is a great idea on so many levels. They provide jobs, keep one man's trash out of the dump, and raise money for more Habitat projects. Check out their website to see if there's a store near you.
Thursday, February 23, 2012
Initial Suggestions
I picked up these cute little cabinet knobs on clearance at Hobby Lobby the other day for a whopping 82 cents a piece. Big spender, here.

I grabbed one for the first initial of each member of the family and now I'm trying to figure out what to do with them.
I thought about a wall rack where we could hang little things for each person (purses, small bags, reminders, etc) to have by the door, but perhaps there is a better idea floating out there in your heads. Any suggestions?
I might have to go back and see if they have enough to spell out our whole last name, too. For less than a buck each, I think I can come up with some thrifty and cute things to do with them.
To see what I come up with for these little guys, and to keep up with my other postings, click "Join this Site" over in the right margin.
Wicked Writing Tips
I love reading and writing, and my blogs are just another way for me to exercise that hobby. In searching for grad schools, I stumbled upon Southern New Hampshire University and was added to their email list-serv. Here is some excellent - and easy - advice from an amazing author via SNHU.
His tips sure make me feel better about what I'm doing. Maybe it means I'm on the right track.
Friday, February 17, 2012
Tea Berry Smoothie

I made this yum-tastic smoothie yesterday for breakfast and I have to say, it was deeee-lightful.
You will need:

1 cup Gloria Jean's Pomegranate Berry Fusion tea
1 teaspoon local honey, dissolved in hot tea
1 cup Strawberry Banana V8 Fusion
Blender
You will do:
Brew tea, allow to cool. Add all ingredients to blender. Blend well. Add more berries for a thicker consistency.
You can substitute:
Without tea, add an extra cup of juice.
Any other berry flavored tea.
You could also yogurt dip and freeze other berries and use those instead.
Add more or less honey to taste. Get your tea up to your taste preference and then add to blender.
Dine and Design
About three years ago we moved into our house, which came complete with formal living and dining rooms. Turns out we're not very formal people, so we didn't have any formal furniture.

We decided to turn the dining room into an office, since it had a door on one side, and an entry on the other just the perfect size to add double doors onto, allowing it to be closed off for privacy. Even though it was farther from the kitchen, the formal living room became our dining room...and sat empty for about a year.
A good family friend was getting a new dining room set, and gave us the old one for free - the best price there is! It's blond wood, with light creamy colored upholstery and wasn't really our style. Before I'd seen it, I had no idea what blond wood was, but it's exactly like it sounds - wood the color of blond hair. Probably not something we'd pick out ourselves, but it was solid wood, high-quality, and came with 4 regular chairs, 2 arm chairs and 2 leaf expansions. And it was free. Free, free, free. Free as a bird. Did I mention that?


I resolved to recovering the chairs with a darker fabric that would really pop against the blond, and that would match our decor better, thus updating the look. I picked up this fabric on sale at Hancock fabric a while back:

It's pretty similar to the fabric we had our couches reupholstered in several years ago (my mom owned our living room set before she married my dad way back in 70s - they've been redone 3 times now and are surprisingly still in excellent shape). The fabric is warm, soft and comfy, and even better, you can wipe it clean with a damp washcloth. Perfect for couches and dining room chairs!
Remember how I said in my lamp redo tutorial I like to tie in one or two elements throughout the house? This reddish orange color follows us around from the living room and kitchen, to the dining room, game room, and our master bath, so that's a plus!
After I bought the solid fabric, I watched too much HGTV and decided that maybe I wanted something fun and funky, but I really can't bring myself to cover the chairs in a crazy pattern that I'll end up hating next year. So, like so many other projects, this one got put on hold.
Fast forward to last fall. Our house was on the market for a few months, but it didn't have any sales action and my husband's transfer was cancelled so we stayed put. While showing the house, we switched the dining room into the actual dining room (instead of where it had been in the living room). Turns out we actually liked the room where it was supposed to be. Apparently it really is easier to serve the dining room if it's by the kitchen. Who knew?
So now that our dining room table has its final resting place, and we've repainted the walls and hung new curtains it's time to get down to business reupholstering and accessorizing.
 |
| dining room rug - the colors look more vivid in real life |
 |
| sage curtains |
I picked up a yard of this printed duck fabric that should coordinate with the red microsuede, the floor rug, and the curtains.


Just trying to decide if I want to do the upholstery on the arm chairs in this, or make some backer pillows for them. Hum, dee-dum...
Suggestions?
Suggestions?
Tuesday, February 14, 2012
Next up!
Okay, on to my next project. Try to contain your excitement.
Clearance and as-is sections of stores can be kind of like flea markets or garage sales. 99% of the time you find complete and total crap. But then there's that 1% when you stumble upon something pretty cool.
A couple of years ago we were digging through the clearance/as-is section of Ikea and found this little guy:

A locking, wooden, and glass door medicine cabinet. I had to confirm with my hubby what we paid for it, and we are both thinking between $10 and $15, even though the original price was around $100. It may have been a little less, but who can really put a price on something from IKEA that's already assembled? Of course, that means it was "as-is"; i.e. missing shelves inside, and it did have a big sticker and goo on the outside, but I got that off easily with Goof-Off. Of course if it's in the as-is department, it's going to take some work. After the internal battle over how much work and money it would take to get it operable and/or enjoyable, I took it to the cash register. It was a great find.
Into the garage it went, and there it's been since. Adding to my list of things I could do and should do but never do. Finishing this off as our new medicine cabinet (we don't have any in our house, just a basket full of stuff in our half-bath linen closet) and first aid kit is my next plan.
Lamp Reveal and "Tutorial"
Finally! I finished my lamp makeover. Whew! And not only is this her big reveal, but also my first real tutorial. Actually, it reads more like a play-by-play, since unless you have the same lamp, your steps might be slightly different, but you get the idea. Looky-look:
Like I said before, the antique-y look of the lamps is nice, but a little dark and I wanted to change it up a bit. I used the lamps in my game room as inspiration.
Although the look of this lamp is a little bit too modern for me (they came with the living room set we have), I do secretly love them. The mirrored look and black shade are real clean, plus the mirrored look makes the lamp and space seem brighter, so I figured I could take that color scheme and apply it to my antique-y lamps. Even though our rooms aren't matchy-matchy, I do like to have one to two themes or color schemes carry through so that there is a cohesion throughout the house.
This project called for a variety of supplies, some of which I did not realize I needed until about halfway through the transformation. Here is what I started out with: Krylon Looking Glass spray paint, painter's tape, tack cloth, beads to replace the original ones, and jewelry pins to hang the beads from.

A word of advice on the spray paint: after traveling to several hardware and home improvement stores (thinking they would have the best spray paint selection and they did have huge amounts, but relatively small Krylon selection) I finally found the Krylon Looking Glass paint at Hobby Lobby. They seem to have the best selection of Krylon that I could find. The Looking Glass paint is much more costly than normal spray paint, and comes in a much smaller can, but you can use one of Hobby Lobby's weekly coupons (typically 40% off) to get it for a steal. My store will even let you just show the coupon on your smart phone, so I'm saving money and saving trees all at once - score! And no, I do not work for Krylon or Hobby Lobby, just passing on a good deal when I find it, and as far as I can tell, Krylon are the only ones making this cool paint I wanted to try!
I'll start at the beginning and you'll see why I realized I needed more supplies at the same time I did. First, obviously, I unplugged the lamp, then removed the shade, shade hardware and light bulb. Next, I covered the part where the light bulb screws in and the cord in painter's tape. In hindsight, I could have probably figured out how to remove the brown cording and replace it with black, but that's not too important to me, nor am I really interested in working with electricity, so I'll let that little detail go...

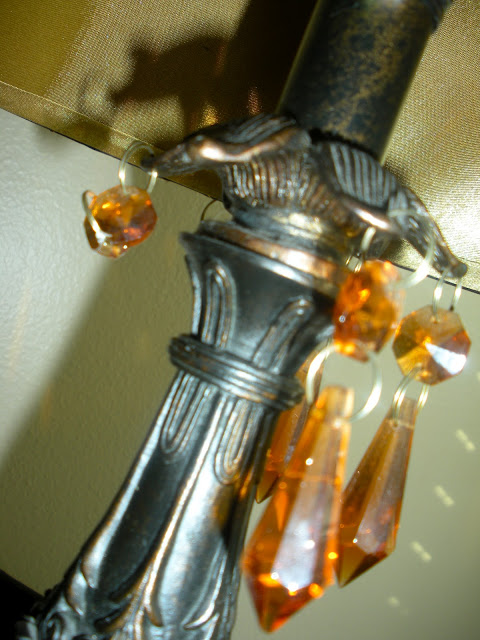
Now, the whole reason I picked out this lamp years ago was because I liked the orange crystals. But years of moves have left several missing, as you can see, so at this point I went ahead and removed the crystals and the rings holding them. I put them aside, guessing I can use them on another project since there aren't enough to salvage for this one. Before I can paint, I rub the whole thing down with tack cloth to get off any dust or residue hanging around. I have no idea what this lamp is actually made of, so I figured that'd be a safe bet without eating away at anything important. You can pick up tack cloth in the paint section of a home improvement store for a few bucks a pack.
And now it's time to paint! I guess since, technically, this paint is supposed to be used on glass, it's very thin and runny. It took 2-3 thin coats on each side to get the desired effect. You'll want to work with it like any other spray paint, using quick, sweeping sprays. I started with the lamp laying on its side, so less of it would run off, thus somewhat eliminating streaks. After all sides dried and had been coated a few times, I stood the lamp up and touched up any streaks or runs with a quick spray. Luckily, it dries pretty quick, so the multiple coats were no big deal. Again, like with any other spray paint, make sure to use in a ventilated area, and cover the surrounding area to prevent overspray issues.
With the lamp painted, I turned my attention to the beads. Here's where I started to run into problems. I couldn't find any beads with a hole horizontally through the tops like the original orange crystals (a little blurry, but hopefully you see what I mean):
I had no choice but to settle for beads from the jewelry making section of the store with one hole, running vertically through it, which is why I got the pins. I figured I'd thread the beads on, and twist the top somehow, either hooking it to the original rings or through the holes in the lamp. This was a good idea, in theory, until I realized the holes in the beads were so big that the pin heads went right on through them. Back to Hobby Lobby I went, in search of tiny black beads, small enough to be a buffer between the pin head and the larger beads with larger holes. And here you have extra supply number one:

On the little rescue beads went, followed by the black jewelry beads. I finished it off by first bending the pin into a sort of upside down "L" shape like this:

After I got this done, I just bent the top part back around counter-clockwise into a sort of question mark shape so I could loop it through the holes in the lamp. I alternated the larger, middle bead, with either solid black, or a transparent, smoke-colored one.


And now the rest of the extra supplies come into play. I couldn't find a lamp shade that I really liked, plus at $15-$20 a pop, I didn't want to settle for one. Again, wandering around Hobby Lobby I stumbled upon a solution to my dilemma. I found white, self-adhesive lamp shades! All you have to do is buy the fabric you want, and stick it to the lamp shade and voila! I instantly became a genius in my own mind.
I grabbed a small cylinder shaped self-adhesive lamp shade, and then a half yard of black burlap. The lampshade actually called for 5/8 yard, but I have no idea why, since I didn't even use up a quarter of what I bought. I used this week's 40% coupon on the shade, which was originally $7.99 and paid $1.99 for the burlap, so I'd say my little shade was a steal! And easy! All you do is peal off the white paper label, lay it over your fabric, and cut out the fabric, leaving about 1 inch grace on each side.
I picked burlap for a few reasons. First, let's be honest, it's cheap. Second, I wanted a black shade, but didn't want to block too much light. And lastly, it's got a nice earthy texture to contrast with my looking glass lamp. Because I wanted the white to show through the black, I did one layer of the burlap. Since burlap has a gridded texture, I had to make sure to wrap it evenly.


After your fabric is wrapped around, just fold the remaining edge in on itself and glue, using either super glue or a glue gun. I used super glue for this part since I wanted a really good hold on the outer seam, and have a teeny tiny clamp I can use. Also because I really enjoy Gorilla Glue and use it whenever possible. Seriously, the handle on my steam mop literally fell off one day and instead of buying a new one, I Gorilla Glued it back on, and it's still working like a champ. This stuff will hold anything, I'm pretty sure. I'm totally not a Gorilla Glue spokesperson, but I do have a small arsenal of it in the garage. Just in case. Back to the lampshade...just dab a little glue under the fold and clamp (or hold for a while).


 |
| Before |
 |
| After |
 |
| Inspiration Lamp |
This project called for a variety of supplies, some of which I did not realize I needed until about halfway through the transformation. Here is what I started out with: Krylon Looking Glass spray paint, painter's tape, tack cloth, beads to replace the original ones, and jewelry pins to hang the beads from.

A word of advice on the spray paint: after traveling to several hardware and home improvement stores (thinking they would have the best spray paint selection and they did have huge amounts, but relatively small Krylon selection) I finally found the Krylon Looking Glass paint at Hobby Lobby. They seem to have the best selection of Krylon that I could find. The Looking Glass paint is much more costly than normal spray paint, and comes in a much smaller can, but you can use one of Hobby Lobby's weekly coupons (typically 40% off) to get it for a steal. My store will even let you just show the coupon on your smart phone, so I'm saving money and saving trees all at once - score! And no, I do not work for Krylon or Hobby Lobby, just passing on a good deal when I find it, and as far as I can tell, Krylon are the only ones making this cool paint I wanted to try!
I'll start at the beginning and you'll see why I realized I needed more supplies at the same time I did. First, obviously, I unplugged the lamp, then removed the shade, shade hardware and light bulb. Next, I covered the part where the light bulb screws in and the cord in painter's tape. In hindsight, I could have probably figured out how to remove the brown cording and replace it with black, but that's not too important to me, nor am I really interested in working with electricity, so I'll let that little detail go...

Now, the whole reason I picked out this lamp years ago was because I liked the orange crystals. But years of moves have left several missing, as you can see, so at this point I went ahead and removed the crystals and the rings holding them. I put them aside, guessing I can use them on another project since there aren't enough to salvage for this one. Before I can paint, I rub the whole thing down with tack cloth to get off any dust or residue hanging around. I have no idea what this lamp is actually made of, so I figured that'd be a safe bet without eating away at anything important. You can pick up tack cloth in the paint section of a home improvement store for a few bucks a pack.
And now it's time to paint! I guess since, technically, this paint is supposed to be used on glass, it's very thin and runny. It took 2-3 thin coats on each side to get the desired effect. You'll want to work with it like any other spray paint, using quick, sweeping sprays. I started with the lamp laying on its side, so less of it would run off, thus somewhat eliminating streaks. After all sides dried and had been coated a few times, I stood the lamp up and touched up any streaks or runs with a quick spray. Luckily, it dries pretty quick, so the multiple coats were no big deal. Again, like with any other spray paint, make sure to use in a ventilated area, and cover the surrounding area to prevent overspray issues.
With the lamp painted, I turned my attention to the beads. Here's where I started to run into problems. I couldn't find any beads with a hole horizontally through the tops like the original orange crystals (a little blurry, but hopefully you see what I mean):

I had no choice but to settle for beads from the jewelry making section of the store with one hole, running vertically through it, which is why I got the pins. I figured I'd thread the beads on, and twist the top somehow, either hooking it to the original rings or through the holes in the lamp. This was a good idea, in theory, until I realized the holes in the beads were so big that the pin heads went right on through them. Back to Hobby Lobby I went, in search of tiny black beads, small enough to be a buffer between the pin head and the larger beads with larger holes. And here you have extra supply number one:

On the little rescue beads went, followed by the black jewelry beads. I finished it off by first bending the pin into a sort of upside down "L" shape like this:

After I got this done, I just bent the top part back around counter-clockwise into a sort of question mark shape so I could loop it through the holes in the lamp. I alternated the larger, middle bead, with either solid black, or a transparent, smoke-colored one.


And now the rest of the extra supplies come into play. I couldn't find a lamp shade that I really liked, plus at $15-$20 a pop, I didn't want to settle for one. Again, wandering around Hobby Lobby I stumbled upon a solution to my dilemma. I found white, self-adhesive lamp shades! All you have to do is buy the fabric you want, and stick it to the lamp shade and voila! I instantly became a genius in my own mind.
I grabbed a small cylinder shaped self-adhesive lamp shade, and then a half yard of black burlap. The lampshade actually called for 5/8 yard, but I have no idea why, since I didn't even use up a quarter of what I bought. I used this week's 40% coupon on the shade, which was originally $7.99 and paid $1.99 for the burlap, so I'd say my little shade was a steal! And easy! All you do is peal off the white paper label, lay it over your fabric, and cut out the fabric, leaving about 1 inch grace on each side.
 |
| Self-adhesive lamp shade and burlap |
 |
| Extra supplies: Gorilla super glue, hot glue and glue gun, small clamp, scissors |
 |
| Trimming the fabric for the lampshade |


After your fabric is wrapped around, just fold the remaining edge in on itself and glue, using either super glue or a glue gun. I used super glue for this part since I wanted a really good hold on the outer seam, and have a teeny tiny clamp I can use. Also because I really enjoy Gorilla Glue and use it whenever possible. Seriously, the handle on my steam mop literally fell off one day and instead of buying a new one, I Gorilla Glued it back on, and it's still working like a champ. This stuff will hold anything, I'm pretty sure. I'm totally not a Gorilla Glue spokesperson, but I do have a small arsenal of it in the garage. Just in case. Back to the lampshade...just dab a little glue under the fold and clamp (or hold for a while).


The final step of the lampshade is just to tuck the edges to the back side, tacking down with glue as you go. I switched to a hot glue gun at this point because I was getting antsy and wanted to see the finished product. If you go this route, just be sure to pull off all the glue strings that accumulate. Do about an inch at a time so your glue doesn't dry before the fabric takes hold. Make sure to pull the fabric tight to avoid any wrinkles in your shade.

Now, all that's left to do is put the lampshade on, replace the bulb, turn on and check it out!


I really like how the paint turned out, allowing a little of its previous darker self to show through (or maybe it's the shadows...), and the way it reflects the light. I think the burlap was a perfect choice to achieve color and texture and still retain light.
Whew! I finished my first tutorial! Hopefully it was neither oversimplified nor overcomplicated. I've got plenty more ideas and projects looming in my future to share with you, which means plenty of opportunity to become a tutorial queen! Hope you enjoyed this and maybe it'll inspire your creativity! Oh, and if you're reading this, but not a follower, do me a favor and swing on over to the right side of the page and click "Join This Site" for me! Hurry up, I'll wait for you. Okay, thanks! And to show my gratitude for following me, I'll be adding more projects and recipes soon. I'm just getting started here.
I'm entering this tutorial in the DIY Project Party Monthly Contest over at The DIY Club! Visit their page http://thediyclub.com/ to check out really cool ideas, or enter the contest, too!
I am also sharing here at the Shine Your Light blog:
Tuesday, February 7, 2012
Muffin Pan Calzones
I'm still pondering the best way to makeover my lamp (I've run into a few snafus), so in the meantime, here's a tasty - read, easy! - little snack to keep things moving.
This is one of those I-made-it-up-based-on-what-I-found-in-the-fridge recipes, so you can easily add in other ingredients to suit your own tastes, i.e. veggies, different meats, etc.
What you will need:
1 can of refrigerated crescent rolls
8 cubes of mozzarella cheese
16 pepperoni slices
about 1/2 cup of Italian blend shredded cheese
1 T garlic salt or garlic powder, more or less to taste
pizza or marinara sauce
pizza or marinara sauce
Preheat your oven to the temperature specified on the crescent rolls. Lightly coat a muffin pan with cooking spray. Line the muffin cups with unrolled crescents, forming to the shape of the cups, like this:

Fill each crescent roll with 1 cube of cheese, 2 pepperoni slices, and shredded cheese. Sprinkle garlic evenly over all cups. Wrap the ends of the crescents over the toppings like this:

Add a dash of garlic on top, and sprinkle with few pieces of shredded cheese. Bake 5-10 minutes until the crescent rolls turn golden brown and cheese is melted. While baking, heat pizza sauce in the microwave in a microwavable dish for about 30 seconds. Make sure to cover it with a paper towel or a microwave safe top. Remove calzones from oven and serve with warm pizza dipping sauce. Enjoy!

Subscribe to:
Comments (Atom)